Publishing and subscribing to RabbitMQ using the .NET Client
Recently I was struggling to understand how a customers RabbitMq project was wired up so I created an example .NET app to play around with it. Turns out their setup code didn’t create bindings and routes out of the box - no wonder it didn’t work when I ran the acceptance tests!
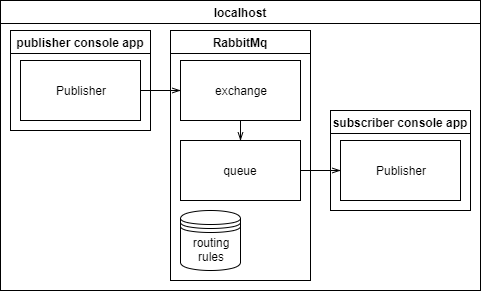
The demo app has two console apps, one publishing messages to the RabbitMq exchange and one subscribed to a RabbitMq queue. We create a RabbitMq exchange and subscribe the queue to all messages sent to the exchange.
Installing RabbitMq on the local machine
RabbitMq is pretty easy to get started with on Windows but with everything is harder at scale. RabbitMq runs atop Erlang, which has a simple Windows installer. After installing Erlang, the RabbitMq service needs to be installed using the RabbitMq installer and then the service must be started and running.
To gain visibility of messages entering RabbitMq and routes they take, you can enable the HTTP management utility which is a web-based administration interface that will run on your local machine.
Enabling the HTTP management utility
rabbitmq-plugins enable rabbitmq_managementYou’ll need an exchange to send messages to (a postbox). You’ll then need to route the messages to clients (routed to sub-exchanges and queues).
Getting the RabbitMq .NET client
I used the RabbitMq NuGet Client package for this.
Install-Package RabbitMQ.ClientAuthenticating RabbitMq using the .NET client
var factory = new ConnectionFactory();
factory.UserName = "guest";
factory.Password = "guest";

// create a connection using default ports
var connection = factory.CreateConnection(Settings.Ports);</pre>
Creating a RabbitMq exchange and routing messages to a RabbitMq queue using the .NET Client
Actions here are idempotent, meaning you can run this more than once and get the same result out of it. If the exchange or queue already exists, you shouldn’t run into any problems.
// a way to manipulate the design of the system
var model = connection.CreateModel();

// create the exchange if it does not exist
// when a message is received, send a copy of the message to each subscriber
model.ExchangeDeclare(Settings.ExchangeName, ExchangeType.Fanout);

// create a queue if it does not exist
model.QueueDeclare(Settings.QueueName, false, false, false, null);

// bind the queue to the exchange
// Settings.RoutingKey is blank, so no filtering occurs
model.QueueBind(Settings.QueueName, Settings.ExchangeName, Settings.RoutingKey, null);
Send a message to the RabbitMq exchange using the .NET Client
Remember that the rules in the exchange defines where the messages go.
var model = connection.CreateModel();

// messages are bytes
var body = Encoding.UTF8.GetBytes("hello world");
model.BasicPublish(Settings.ExchangeName, Settings.RoutingKey, true, new BasicProperties(), body);

Console.WriteLine("Message sent");
Subscribing to a RabbitMq queue and handling messages using the .NET Client
var subscription = new Subscription(connection.CreateModel(), Settings.QueueName);

// grab the message bytes and convert using the same encoding
foreach(BasicDeliverEventArgs e in subscription)
{
 Console.WriteLine("Received Message: {0}", Encoding.UTF8.GetString(e.Body));
 subscription.Ack(e);
}
Source
Check out my Github RabbitMq Example to get the source